Ho! Ho! Ho!

Hey everyone and welcome again to another Visible Image instalment!

When I saw the Ho! Ho! Ho! stamp from the new release it reminded me of a Christmas decoration we had when I was small.  The Santa was a mobile with each element cut from card that was yellowing, torn and sellotaped back together and hung from the ceiling with cotton.  I remember feeling quite sad the year it had to be thrown away as I loved putting it up and watching it twirl around.

The Ho! Ho! Ho! stamp though is incredibly similar and I knew instantly I had to have a go at replicating the decoration albeit on a much smaller scale.

After die-cutting an aperture out the card stock and the card blank, I added some sheet music from an old book (Verdi’s Requiem if you’re interested!) using Matt Gel Medium.

I wanted to add some words around the edges, so using the Christmas Backgrounds stamps, I stamped onto plain masking tape using a Versafine ink pad and then clear embossed over the top so I could colour it and not ruin the text.

Over the music and the stamped masking tape, I added the Inked Holly stamp using WOW!’s Metallic Gold embossing powder as I knew I was going to add a sprig of holly to the corner and this would bring it all together.

I coloured the background using Distress Spray Stains in Candied Apple, Picked Raspberry and Abandoned Coral and then added more gold embossing powder around the edge of the aperture and the card using WOW!’s Freestyle Tool.

I wish I’d remembered to take photos of me making the Santa but sometimes I just get ‘in the zone’ and switch off and forget so apologies!

Firstly, I’ve heat embossed the stamps onto water colour card using a grey opaque embossing powder and then trimmed them out.  To add some texture to Santa, I’ve used a WOW! Embossing pen and their Sparkling Snow to add the fluffy edge and pom-pom to his hat and then to strips in his beard and moustache.  Using watercolour pens, I’ve then added colour to the hat and greys to the beard leaving the glasses plain.

It is nice and easy to make, just a bit of patience required when adding the cotton to get it straight. To attach it, I’ve just used tape before adding the coloured card over the top.

The background, uses Distress Oxide Sprays and the Boot Print stencil on watercolour card. I’ve simply sprayed the card with Tumbled Glass, Hickory Smoke and Picket Fence before adding some shimmer spray. Now I think something went wrong somewhere in this process as after drying I used Crackle Paste to add the boots… however, once the paste had dried, it all fell off! So I added a layer of matt varnish to seal the colour and then used a grit paste to add the boots… which stayed perfectly!

To finish, I’ve heat embossed the Inked Holly sprigs and layered them onto the corner using foam tape.

Once you get going, it didn’t take too long to make and I’m going to try and make a few (smaller and possibly not as involved) versions for my Christmas cards this year!

So here are the new products I’ve used for the make…

I hope you’re enjoying all the inspiration from the design team… there has been some spectacular makes! As always, join in on the Visible Image Facebook group or follow them on Instagram. Don’t forget everything we make gets uploaded to good ol’ Pinterest too!

See you next time… H x

October Guest Designer Wow! Embossing Powder

Hello everyone… or should that be ‘Cześć’ as I’ve just come back from a little break in Krakow and Lodz.  Absolutely fantastic place and thoroughly recommend to everyone!!

I was asked a while back if I’d like to be the October Guest Designer for Wow! Embossing Powder and of course I said yeeeeess please!!  Wow’s products are always on my craft desk and I honestly don’t think you can buy better quality powders (I’ve tried – always gone back to Wow!).  The sheer range of colours and genres (metallics, sparkles, opaques, pearl, glitter, even glow in the dark and puff!!) is phenomenal and their Slow Drying Embossing Pad is just perfect.  If you haven’t tried them and you’re into your stamping, just buy a couple (they’re only cheap) and try them for yourself.  You will love them and to watch them melt – so mesmerising!!

Anyway… you might have seen my makes and blog posts for Wow! Embossing Powder over the last few weeks but suddenly realised I hadn’t blogged them on my site… shocker.  My first make for them used their gorgeous Thankful stamp set with Metallic Gold Sparkle powder.

‘Merry and Bright’

Heat emboss with the Metallic Gold Sparkle, colour and add extra sparkle with a Tonic Nuvo Aqua Shimmer Pen

Distress oxide background for a chalky, grungy look with an aperture die-cut. Add more embossing powder to frame.

Finished card with the products used

You can find the full write up for Wow! over on their blog… just press HERE!

My next make for Wow! uses Aall and Create stamps and stencils and looks a little something like this and uses Black Twinkle and Pop from the Confetti Trio (the little polka dots around the edges).

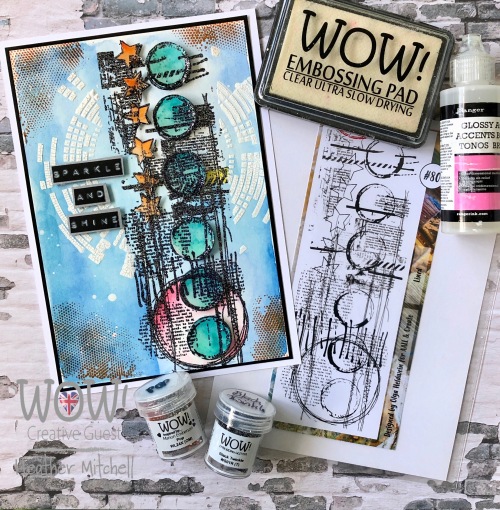
‘Sparkle and Shine’

Heat emboss on watercolour card with Black Twinkle and paint using watercolour paints

Mask the border stamp to add the stencil before adding dimension to the project using glossy/crackle accents and foam dots.  Stamp polka dots around the edge to frame using ‘Pop’ from the ‘Confetti’ trio

Finished card with the products used

Again, the full write up for Wow! can be found HERE!

My next make you make not have seen as it’s part of the inspiration for Wow!’s October Challenge (Christmas) and uses just the one colour – the beautiful Rose Gold.

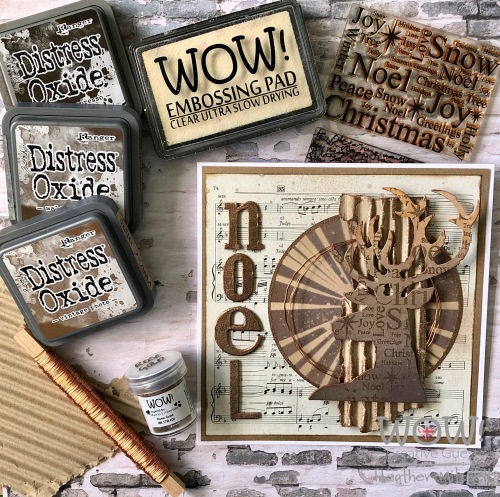
‘Noel’

Ombre a background, spritz with gold ink and heat emboss using the beautiful Rose Gold powder from Wow!

Tear some corrugated cardboard and swipe the slow drying embossing pad over the ridges before dusting with the Rose Gold powder and heating

Layer the elements over one another before matting onto card

Finished card with products used

So there we are.  That’s the first three of my makes although I do have a couple still to share.  Hope you like them… I’m pretty chuffed with them although to be honest the powders make it so easy!  You can see LOADS of inspiration over on Wow!’s Facebook page or upload your own makes to their Facebook Fan Page and see what everyone else has been up to!

I’ll be back soon with new makes to share.

H xx

Christmas Eve: Visible Image

Hello everyone…

It’s my day to share another of my latest DT makes for the fabulous Visible Image and today’s is another Christmas card!

This card uses Christmas Eve, a really gorgeous set of stamps that you can layer up and do all sorts with!

So… I started with a simple watercolour background to which I spritzed on Tattered Angel’s Glimmer Mist and then splattered some watery Gesso over once the Glimmer Mist was dry.

The roof top stamp was them heat embossed using Wow!’s Black Ebony Super Fine powder and then I’ve highlighted the rooftops using a white Posca pen and coloured in the windows using a yellow Sharpie.

I’ve added a scribbly hand drawn border using a fine liner and popped on some zig-zags to look like stitching.

The Christmas tree has been stamped using Bright White Opaque Wow! powder and has been embossed onto black card and then simply fussy cut and adhered to the card over the roof tops slightly using foam tape.

I felt the card was looking a little ‘cold’ (if you get me) so I heat embossed some stars using Wow!’s Metallic Gold Rich powder and this just adds a little warmth.  To add extra interest to the corner, I’ve stamped the holly from the Christmas Chaos set twice, trimmed around one so just the holly remains and then used tiny foam dots to attach to the original holly image.  Having coloured it using watercolours, I  added glossy accents to give a lovely shine!

To finish, the sentiment has been stamped using VersaFine Clair (in Nocturne) and then for some extra Christmas sparkle, I’ve adhered a few clear adhesive gems in the night sky.

Here’s the Visible Image stamp sets I’ve used to make this card…

Christmas Eve


Don’t forget to check in regularly on the Visible Image Facebook page for loads of inspiration and tips from the other DT members and of course Instagram has loads of makes (especially if you search for #visibleimage!)

Catch up again soon… thanks for looking!

H x

Christmas Chaos: Visible Image

Hello everyone,

I’m back today sharing another Christmas make for Visible Image.  I’ve used the fabulous Christmas Chaos and the Christmas Backgrounds sets which are just brilliant especially if you like grungy makes like I do!

I kept the background for this card nice and simple, using Distress Oxide’s to create a traditional coloured background to which I added Paperartsy’s Infusions to give a little more depth and then spritzed with some shimmer spray for some glitz.

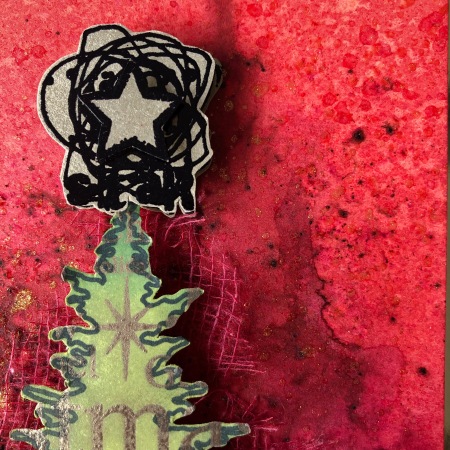
For the Tree, I coloured some card using Distress Oxide’s again and then heat embossed the beautiful Christmas text using Wow’s Metallic Gold powder to give a rich, warm colour.  Over this I stamped the tree outline from the Christmas Chaos set and fussy cut it out.

I’ve heat embossed the star image three times onto gold card and trimmed two and then trimmed just the star.

After adding foam dots to one of the images and to the trimmed star (so I can layer it up over the top of the tree) I’ve popped this to one side to add some dyed cheesecloth.

The cheesecloth was dyed using Distress Spray Stain and I used the Candied Apple red to match the background of the card. I didn’t want it to stand out too much, just provide a hint of texture under the tree.

The cheesecloth has been glued into place and then the tree added over the top with foam dots behind it.  I added two dots stacked together in the middle of the tree and just one on the outer edges as I wanted a curved look rather than just a flat finish.

For the sentiment, I ripped two sections of vellum and stamped on the top one before stapling it in place and winding round some twine.  This was them matted onto gold card (same card as I stamped the stars onto) and adhered to a card blank.

Fairly simple card for me and it’s a traditional card with a modern edge, if you get me.

Here is the gorgeous Visible Image stamps I’ve used for this make…

Christmas Chaos


Christmas Backgrounds


Don’t forget to get hold of all the latest Visible Image news and inspiration form the DT by following them on Facebook and Instagram.  Some lovely (and might I add super talented ladies) have joined us on the permanent DT from the guest DT and are making some amazing projects so keep an eye out for them!

That’s all from me today but I’ll catch up soon when I just might have some news to share 😉

H xx

Christmas Chaos: Visible Image

Hello everyone,

Seems a tad weird posting Christmas makes in this amazing weather (too hot?!) but with Christmas fast approaching, I couldn’t resist playing with the new Christmas releases from Visible Image… so I’ve plonked myself down in the garden under a HUGE umbrella with my two hot water bottles Stan and Syd the Dachshunds next to me (because that’s what you need in this heat… two dogs snuggled right up close!)

Christmas Chaos is a ‘very me’ stamp set.  A mixed media set that is perfect for grunging up and layering and getting inky with… or not… it depends on how you like to work.

I have to admit, I’ve used four of the new stamp sets on this make but the main focal point, the wreath, is made from Christmas Chaos.

I didn’t take any stepped photos for this make (apologies Mark and Helen!) as I got too ‘in the moment’ and this is the only one I remembered!  Having stamped each of the smaller images, the holly, the scribbled star and the number 25 from the number line, I’ve coloured each one using a mixture of watercolours, spritzing inks and watercolour pencils in order to get  vibrant Christmas colours.  Once dried I’ve gone over certain elements using a Tonic Studios Nuvo Aqua Shimmer pens to give a hint of sparkle, scribbled a white Porsche pen over some and added glossy accents to others.

Once dried, they were all fussy cut out (no mean feat I can tell you!) and placed to one side.

The middle of the wreath I decided to make into a shaker, so having die-cut my circles out, I used Distress Oxides (Black Soot, Chipped Sapphire and Faded Jeans) to create a dark sky background.  After a little splatter of Hickory Smoke Distress Oxide Spray and some white Gesso splatters, I’ve heat embossed the gorgeous little roof stamp and some stars from the Christmas Eve set using Wow Embossing Powders.

For the shaker element, used beads and some sequin stars I’ve had hanging around for ages and, after constructing it all together, I added some bells (why not, it is Christmas!) and some small glitter balls I’d saved from some crackers years ago.

As the wreath element is quite busy, I chose a simple background on which it could sit so stamped the larger text stamp from Christmas Backgrounds in Festive Berries – how apt!

The sentiment, from Sentimental Christmas, was stamped using Versafine Clair (in Nocturne) and matted onto red and black card before adding foam tape to the rear to give it a little lift.  I added a sprig of holly to the sentiment and one to the top left of the card and ta-da!  All finished!

Here’s some lovely images of the new Christmas stamps for you to drool over…

Christmas Chaos


Christmas Eve


Christmas Backgrounds


Sentimental Christmas

The Visible Image Facebook and Instagram pages are brimming with inspiration at the moment so check back regularly to keep up to date!

I’ll see you again soon with more Christmas makes… I’m off to enjoy some sun!

H xx